Pages

Tuesday, September 30, 2008

Two in One Inspiration

I like to see the creative process behind creative projects. Maybe you do too. Here's a little glimpse into mine. This is the dress that inspired the little blue and yellow dress I just completed. You may recognize it. My little boy is very into trains, and this year for our traditional Mother's Day gift of a children's book, he and his daddy picked out The Little Engine That Could by Watty Piper. (My little one spilled the beans before Mother's Day. It's so hard to keep something so exciting a secret. He must get that from me.) As we read it over and over, I felt myself drawn to this little doll in the illustrations. Maybe it's because I'm a brunette, but I've always liked brunette dolls better, and the vintage-y feel of the blue and yellow dress this one wears just spoke to me.

Freezer Paper Stencils

Here's the tutorial on the freezer paper stenciling I did on the pocket of the two in one dress. Panjokids has a great tutorial on these freezer paper stencils, and I just had to try it out. I had to laugh when I started because the author Ellie talks about not being able to find a regular artist's brush at home so she used an old cosmetic's brush. Believe it or not, I couldn't find mine either; they have since reappeared but only after I ended up using a makeup sponge!

Skill level: Beginner (You could make it more challenging if you wanted to by choosing a more complex pattern or adding more colors of paint.)

Supplies:
Freezer paper (found near the wax paper at the grocery store)
Fabric
Fabric paint
Brush (or make-up sponge:)
Clip art or other pattern to stencil

Instructions:
1.Trace your pattern onto the freezer paper. Make sure that the pattern is facing the correct direction when the shiny side of the freezer paper is down.

2. Carefully cut your pattern out using a craft knife. (See Panjokids tutorial if you have a pattern with areas that need to be masked off within the pattern body.)

3. Place your pattern shiny side down on the fabric or item of clothing you wish to stencil on. Using a medium heat setting on your iron, iron your pattern to the fabric for a couple of seconds or until it sticks. I like to use the tip of my iron to go around the edges just to make sure they are firmly adhered.

4. Apply paint evenly to your brush or sponge. You may have to dab it a couple of times to remove the excess paint. Apply the paint to your stencil. I just dabbed it on using an up and down motion with my sponge. I had to do a couple of coats because the paint was so much lighter than the fabric.

*Oh, I almost forgot. Be sure to put some sort of drop cloth below the fabric because the paint will seep through. Also, don't handle the fabric too much while it's wet. I did and got paint where it shouldn't be :( but it ended up being on the seam allowance so it was okay :)

Okay, so I actually liked using the make-up sponge because it went on fairly evenly, and I could toss it at the end if I wanted. Kind of like my disposable paper plate pallet. I recommend using both if you are doing this project with kids.


The picture above is actually from the back of the fabric. It makes a fun distressed look, so there's another option for you. Just be sure to reverse your pattern if you plan on painting from the back of the pattern.

5. When the paint is dry, remove your stencil by carefully peeling it off.

Click on the picture below to get my little bird pattern.

Monday, September 29, 2008

Dalek Cake

For those of you Dr. Who fans out there, here is the Dalek Cake I made for a friend's birthday party. (For my fellow Americans who haven't yet experienced Dr. Who, Dr. Who is a British sci-fi T.V. show equivalent to Star Trek in the States minus a lot of the "I am Kleptar from the planet Ooptigarn. My ship is damaged and is in need of whobitigoobity and a refractory some scientific word lasar warp engine" and all that mumbo-jumbo. Not that that's bad, I grew up on Star Trek. Live long and prosper. Star Trek's just a little harder for Star Trek outsiders to get into. Dr. Who is a little more mainstream. It's been around forever, but has recently been re-done, and my husband and I are hooked. My little two-year-old can even sing the theme song. Dr. Who keeps getting better and better as time goes on.) I apologize for the bad image quality. These were taken with my phone just after I dropped my other camera.
Supplies:
Wonder mold pan (from Wilton)
Cupcake tin
Paper Cupcake Cups
2 Cake mixes
Chocolate Frosting
Black Food Coloring (Optional)
Toothpicks
Bamboo Skewer
1/2 cup Chocolate Chips
1 tbsp margarine or butter
Whoppers or another chocolate covered malt ball
Pretzel Sticks
Waxed paper

Instructions:
1. Bake one cake mix in the wonder mold pan and one cake mix worth of cupcakes. (You really only need two cupcakes for this cake, so if you wanted to, you could use a little of the batter from the wonder mold cake for the two cupcakes. I just wanted to have a few extra cupcakes around for the party guests.)


2. Level the wonder mold cake so that it will sit flat when it is flipped over. (I cut it at an angle to make one side of the body appear to extend further like a real Dalek robot.)


3. Cut the rounded top off one of the cupcakes.


4. Place cut cupcake on the top of the domed wonder mold cake. Place complete cupcake on top of that.
Secure layers together by sticking a bamboo skewer through all three layers. Cut off the excess skewer.


5. Frost the cake with the chocolate frosting, first with a light coat to minimize crumbs, and then with a thicker coat to cover the entire cake. (I put a little black food coloring in the chocolate frosting to make it a little darker.)


6. Cut about a cup of the malt balls in half.


7. Stick the malt balls on the cake in vertical columns.


8. Melt chocolate chips and the tbsp of margarine in the microwave for about 30 seconds or until the chocolate is melted and smooth when mixed.


9. Roll a toothpick in the melted chocolate and stick it into a cut malt ball to create the Dalek's plunger thing. Dip the cut malt ball end into the chocolate and then place onto the waxed paper.

10. Roll another toothpick in the melted chocolate and stick into a complete malt ball to create the Dalek's "eye."

11. Coat a pretzel stick in chocolate.

12. Stick eyeball, plunger and ray gun into the cake in their appropriate places.

13. Mix more black food coloring into the remaining frosting. Using this darker frosting and a basket weave decorating tip pipe lines around the top of the Dalek (the cupcake layers).

14. Pipe a scalloped edge along the bottom to clean up the edges. I did this with the basket weave tip as well.

Done! Now you have your own Dalek cake!

Saturday, September 27, 2008

Tu Tu Winner

The winner of the tu-tu giveaway is Maureen of Cooking My Life! She's a grandmother with a great sense of humor and a greater sense of wisdom. I've enjoyed getting to know her through her blog. (And can I just say I love that she calls her granddaughters "grandchicks!") Congratulations!

Thank you all for showing interest. It's nice knowing that someone other than me has seen my blog!
As a side note: I am a BIG hat person, so it only seemed fitting for me to draw the name from one. This is my newest one from Forever 21.
My husband was the one to draw the name this time. He was so cute with his eyes tightly closed. He missed the hat on the first try so I know there was no peeking involved!

Friday, September 26, 2008

Two in One

Here is the recent project that has absolutely consumed all my time. This little dress is for my newest niece Alice, or Allie for short. With a name like that, how could I resist making an Alice in Wonderland costume for Halloween? While I was at it, why not make it work for two different occasions hence the blue and yellow version. Two outfits in one!


For this dress I used Simplicity pattern number 5279 (with a few added touches of my own.) I'd really like to share them with you now, but my little one has just awoken EARLY from a nap! Fooey. So in the next coming days look for tutorials on the pintucked bodice, the freezer paper stenciled bird, and the ruffled pinafore cap sleeves.

Wednesday, September 24, 2008

I'm Being Featured!

I am being featured today on the Twilightations blog! I am so excited and flattered! Check it out here!

Friday, September 19, 2008

Tu-tu Giveaway!

Do you want a tu-tu too?

I think it's time for another giveaway! This time I'm giving away a pink tu-tu and a set of two pink hair clips to match. The tu-tu is 20 inches around the waist. Details on how to enter are below.


Here's how to enter the giveaway:

Add a link to this post on your blog or personal website. If you use Blogger it's really simple, just click where it says "Links to this Post" at the bottom of this post, then click where it says "Create a Link," follow Blogger's instructions, and "shazam," you're done. If you don't use Blogger, no worries. Just create a link on your page as you normally would. I should be able to see it, but just in case, leave a comment telling me where to find your link, and I'll count you in.

No blog, still no worries. You can enter the drawing by adding a comment to this post. Just click the "comments" button located at the bottom of this post, write something nice and a way to contact you, and click "Publish your comment." You're in.

Oh yeah, if you add a link AND leave a comment, I'll put your name in twice!

LAST DAY TO ENTER is Friday SEPTEMBER 26, 2008. The winner will be announced the next morning, Saturday the 27th.

And as always, if you want to make your own, the links to the instructions are below:
Instructions to make a tu-tu
Instructions to make clips

I can tu-tu, can you?

When my sister-in-law Aubrey was in town last month we made these little tu-tus. They are the so quick and simple. This is a project that doesn't even have to wait for naptime. You could finish this project while your little ones play, and it is easy to put away and start again later if playtime turns ugly. Ooo and there's more, it's cheap and makes a great Halloween or dress-up accessory.

Skill level: Easier that easy

Supplies:
-20 inches of 1 inch wide elastic (or enough to go around your little girl's waist)
-3 1/2 yds tulle (cost about $1/yd at JoAnn's, less if you use a coupon) (The brighter colors seem to work best.)

Instructions:
1. Begin by cutting your tulle into 6" by 20" rectangles.


I found an easy way to do this was to start by folding the tulle in thirds lengthwise. (Tulle comes 60" wide so this divides it into three 20" sections.)

Next, use your rotary cutter or scissors to cut 6" strips.

Then, run your scissors along the two fold lines to divide each strip into 3 pieces.

(This sounds more complicated than it is. Click on the picture below for a visual explanation.)


2. Overlap the ends of the elastic to form a ring. Make sure there are no twists. Sew the ends together.

3. Tie each 6" by 20" rectangle around the elastic making sure the ends are even. (See below.)

The tu-tu will look a little bare at the beginning, but by the time you have 20 or so rectangles tied onto the elastic it starts looking good.

SPECIAL NOTE: I found out after originally posting this that you can actually buy the tulle on a 6" wide spool! Then, all you have to do is cut it to your desired length. (I used 20") Talk about saving time! (Thank you Lyssa!)

Wednesday, September 10, 2008

Make Believe Frock GIVEAWAY !!!!!!!


Make Believe Frock GIVEAWAY !!!!!!!

I love the color combination on this one. One of my favorite shades of blue, throw in a little red accent, I'm there.

Monday, September 8, 2008

Sleepytime Bear Nightgown GIVEAWAY !!!!!!!

I love this little crocheted hat and the lace detail.
Sleepytime Bear Nightgown GIVEAWAY !!!!!!!

Saturday, September 6, 2008

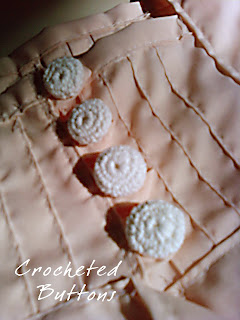
Crocheted Covered Buttons


Here is the pattern for the crocheted buttons featured on my pink pinafore.

Skill level: Intermediate

Supplies:
Crochet thread (your choice of color)
Size US 5 crochet hook
1/2 inch flat button (preferably the same color as your thread)

Abbreviations
:
ch = chain
beg = beginning
sc = single crochet
sl st = slip stitch
* = repeat between *'s

ch 4, join to beg ch with sl st to form a ring

Round 1: 10 sc in ring, join with a sl st to beg sc

Round 2: ch 1, sc in next 2 sc, 2sc in next sc, sc in next 3 sc, 2sc in next sc, sc in next 2 sc, 2sc in next sc = 13 sc

Round 3: *sc in next 3 sc, 2sc in next sc* *repeat two times more, sc in next sc = 16 sc

Round 4: sc in each sc = 16 sc

PLACE BUTTON INSIDE COVER

Round 5: sc in next 2 sc * skip next sc, sc in next 2 sc* repeat eight times more.

Round 6: *sc in next sc, skip next sc, repeat four times more. (This creates the shank to use in sewing the button to your garment.

Finish Off.

Pink Pinafore

I finished this little pinafore last week. I used Butterick pattern #3186 which I am sorry to say is out of print. (It's a little pioneer dress with an apron.) I used the apron pattern to create this pinafore and just sewed up the back seam that was originally left open to about 4 inches below the back tie. I also added a little pintucking to the hem. THE INSTRUCTIONS FOR THE PINTUCKED HEM ARE BELOW. (You can add this hem to almost any dress or skirt pattern. I've even added them to the bottom of pajama pants. Just add 1 inch to the lower edge for each pintuck you plan to add.)

I also made, yes MADE, the crocheted buttons, and you can too. Here's my pattern.


Here are a few of the detail shots:


To create the pin tucked hem:
Before starting, add 1 inch to the lower edge for each pintuck you plan to add to your garment.
1. Press a fold 2 1/2 inches from the unfinished edge toward the inside of the dress.
2. Press another fold 2 inches from the last fold for each additional pintuck you plan on adding. (I used three pintucks.)
3. Sew along each foldline a half inch from the folded edge.
4. Press raw edge 1/4 inch toward the inside of the dress, and then fold over again to hide the raw edges.
5. Sew bottom hem 1/8 inch from folded edge.
6. Press all pintucks toward the bottom of the dress.

(By the way, Butterick pattern #4054 is similar, but you would have to sew up the sides on the skirt and add an opening in the back. I suggest taking the back pattern pieces, folding them in half, and adding 5/8 inches to the back center (folded) line.)

My First Blog Award!


I'm so excited! Lyssa of Stuff Lyssa Makes and Twilightations has given me a blog award!

It made my day!

Friday, September 5, 2008

New Header


Some of you may have noticed that I recently changed my blog name from "This and That, Tabicat" to "Refugee Crafter." Now, when you type in www.refugeecrafter.com, it sends you right to this blog! Why the change? Well, I've wanted to own my own domain name for a while. I guess it just makes me feel more official. Refugeecrafter.com was easier to remember (and spell) than either my name or thisandthattabicat.com.

I call myself a refugee crafter because without a craft room, I am always moving my projects from one room to the next. Someday those projects will have a home, but for now, I'll settle for being the Refugee Crafter with a cool new header.

Thursday, September 4, 2008

Table Cloth Skirt and Dinner Party Top GIVEAWAY !!!!!!!


Table Cloth Skirt and Dinner Party Top GIVEAWAY !!!!!!!

Tuesday, September 2, 2008

Dress Winner!

Congratulations to our high-bidder Julie of The Brinton Crew! You have won the dress and skirt! Thank you so much for your generosity! Please donate your money to the Stephanie Nielson Donation Fund, and email me your address and the confirmation at refugeecrafter@gmail.com. I'll do the rest.


Related Posts with Thumbnails