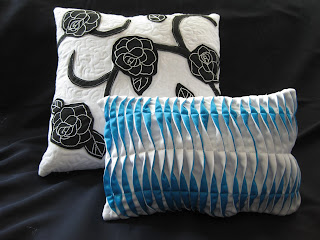
Pillows!
I debated not posting this until these pillows got to the post office, but I just can't wait. Don't ever put me in charge of your surprise birthday party. I'd never pull it off. Then again, I suppose if you put me in charge then you'd already know about it anyway and we'd be all good.
In any case, SURPRISE KACEY! They're done! (And surprise to the rest of you, there's a quick tutorial below!)

For those of you who don't follow Kacey at Chronicles of a Mommy (the new owner of these pillows), first, go check out her blog. Now is fine. It's okay, I'll still be here when you get back.
See what I mean? Fabulous.
Perhaps in your rush to see the rest of my post you missed her bedroom redo posts. Like the one where she first mentioned this bedspread from Pottery Barn, which she later purchased:

Recognize where I got my inspiration too?! Add in this coat for inspiration from what I think was Boston Proper (that's the problem with cutting out pictures from catalogs - I guess I just figured it was more expensive than I could afford):


A Few Details of the Black and White Rose Pillow
In any case, SURPRISE KACEY! They're done! (And surprise to the rest of you, there's a quick tutorial below!)


For those of you who don't follow Kacey at Chronicles of a Mommy (the new owner of these pillows), first, go check out her blog. Now is fine. It's okay, I'll still be here when you get back.
See what I mean? Fabulous.
Perhaps in your rush to see the rest of my post you missed her bedroom redo posts. Like the one where she first mentioned this bedspread from Pottery Barn, which she later purchased:


Recognize where I got my inspiration too?! Add in this coat for inspiration from what I think was Boston Proper (that's the problem with cutting out pictures from catalogs - I guess I just figured it was more expensive than I could afford):


I think these pillows will fit in just swimmingly!
Here are a few details from the black and white pillow followed by a some instructions. (I apologize that the tutorial for the black and white pillow is not super in depth. I forgot to take pictures along the way to help me remember. If you have questions, just email me or post a comment. The second tutorial for the blue and white pillow is better.)
Here are a few details from the black and white pillow followed by a some instructions. (I apologize that the tutorial for the black and white pillow is not super in depth. I forgot to take pictures along the way to help me remember. If you have questions, just email me or post a comment. The second tutorial for the blue and white pillow is better.)


A Few Details of the Black and White Rose Pillow
Quick How-to for the Black and White Rose Pillow:
I liked the contrast on the coat above, but hated the rough, cut-out edges around the roses, plus, I knew I'd never be able to sew the white outlines so smoothly on my sewing machine (not the machine's fault) so I opted to hand embroider the roses. I used this image from clipartof.com:

1. I transferred the image to my black linen fabric by coloring the back of the image in chalk, putting it on top of my fabric, and then tracing it. Then, I went over the chalk outlines with a white colored pencil to make sure they'd stay. All this would have been easier if I'd had white transfer paper, but "necessity is the mother of invention" right?
2. I then embroidered the flowers using a stem stitch and three strands of white embroidery floss. (The leaves were just free handed onto the fabric with a white pencil.)
3. I cut out the flowers and leaves leaving a wide (inch or so) margin around them.
4. I then used this tutorial to applique the flowers and the roses to the white background with the exception that I machine-stitched rather than hand-stitched them down with a matching thread. *
6. With all the black pieces sewn down to the top now, I cut out one square of white fabric the same size as the pillow top, one of black fabric, and one square of batting. I sandwiched the batting between the pillow top and the square of white fabric and pinned.
7. To create the wavy machine quilting lines between the roses, I took the now pinned top and batting and placed it in an embroidery hoop, which is tricky with all the bulk. Then I set my machine stitch length really small and put the part of the top secured inside the hoop under the pressure foot and started sewing. I then did something I was always told not to do in normal sewing and FORCED the fabric under the needle in a wavy pattern rather than letting the feed dogs pull it through.
The hoop acts kind of like a steering wheel letting you easily movie the fabric around. I tried it without one first, and it worked, but it was decidedly more difficult. The faster I moved my hoop the larger my stitches were, the slower I moved it, the slower the stitches.
8. Finally, I sewed the black square back of the pillow to the front leaving a small space to put the stuffing in, turned it inside out, stuffed it, and then sewed the hole closed.
The Blue Pintucked Pillow:
Supplies:
24 strips of blue fabric 1" wide and 15" long
24 strips of white fabric 1 1/2" wide and 15" long
1 strip of white fabric 2" wide and 15" long
White or blue fabric for back
Stuffing
Blue thread
White thread
Instructions:

1. Sew the white and blue strips together alternating colors and beginning with the 2" white strip. Position the fabric so that the 2" strip is on the left hand side. (This is only so that the rest of my right and left instructions make sense.)


2. Fold and press along the left side of each blue strip. On each fold, stitch in the seam along the right hand side of each blue strip to form flaps/folds as seen above.


3. Press all flaps down to one side so that only the white sides are showing. Stitch with the white thread along the top and bottom about 1/2" from the edge. Then stitch directly down the middle.

4. Re-thread your machine with the blue thread. In each of the two sections created by the previous stitching, fold the flaps the opposite direction so that the blue side is showing. You may have to pin the flaps in place. Stitch down the center of each section.
5. Cut out a piece of either blue or white fabric the same size as the top. Sew it to the top with right sides together leaving a small gap for stuffing. Turn it inside out, stuff it, and sew the hole closed.
One of the things I really like about this pillow is that it changes depending on the angle at which you are viewing it.
I liked the contrast on the coat above, but hated the rough, cut-out edges around the roses, plus, I knew I'd never be able to sew the white outlines so smoothly on my sewing machine (not the machine's fault) so I opted to hand embroider the roses. I used this image from clipartof.com:

1. I transferred the image to my black linen fabric by coloring the back of the image in chalk, putting it on top of my fabric, and then tracing it. Then, I went over the chalk outlines with a white colored pencil to make sure they'd stay. All this would have been easier if I'd had white transfer paper, but "necessity is the mother of invention" right?
2. I then embroidered the flowers using a stem stitch and three strands of white embroidery floss. (The leaves were just free handed onto the fabric with a white pencil.)
3. I cut out the flowers and leaves leaving a wide (inch or so) margin around them.
4. I then used this tutorial to applique the flowers and the roses to the white background with the exception that I machine-stitched rather than hand-stitched them down with a matching thread. *
"Be sure to cut out a reverse image of your pattern on the freezer paper. Remember the shiny side has to adhere to the back of your rose,"*5. Oh, I'm getting ahead of myself! I appliqued the vines down before the roses and leaves using the same applique tutorial above and white thread in my machine for contrast. (I just free handed the them onto the shiny side of the freezer paper, cut them out, ironed them to the black fabric, and cut around them leaving a wide margin.)-Experience
6. With all the black pieces sewn down to the top now, I cut out one square of white fabric the same size as the pillow top, one of black fabric, and one square of batting. I sandwiched the batting between the pillow top and the square of white fabric and pinned.
7. To create the wavy machine quilting lines between the roses, I took the now pinned top and batting and placed it in an embroidery hoop, which is tricky with all the bulk. Then I set my machine stitch length really small and put the part of the top secured inside the hoop under the pressure foot and started sewing. I then did something I was always told not to do in normal sewing and FORCED the fabric under the needle in a wavy pattern rather than letting the feed dogs pull it through.
The hoop acts kind of like a steering wheel letting you easily movie the fabric around. I tried it without one first, and it worked, but it was decidedly more difficult. The faster I moved my hoop the larger my stitches were, the slower I moved it, the slower the stitches.
8. Finally, I sewed the black square back of the pillow to the front leaving a small space to put the stuffing in, turned it inside out, stuffed it, and then sewed the hole closed.
The Blue Pintucked Pillow:
Supplies:
24 strips of blue fabric 1" wide and 15" long
24 strips of white fabric 1 1/2" wide and 15" long
1 strip of white fabric 2" wide and 15" long
White or blue fabric for back
Stuffing
Blue thread
White thread
Instructions:

1. Sew the white and blue strips together alternating colors and beginning with the 2" white strip. Position the fabric so that the 2" strip is on the left hand side. (This is only so that the rest of my right and left instructions make sense.)


2. Fold and press along the left side of each blue strip. On each fold, stitch in the seam along the right hand side of each blue strip to form flaps/folds as seen above.
At this point, my pictures become slightly less useful because they are all a different direction from the ones above, and they don't have a wide 2" strip at the end. I realized while making mine that I'd need one next time. I learn as I go. Thank goodness for the contrasting colors to help make the instructions clear in the end.


3. Press all flaps down to one side so that only the white sides are showing. Stitch with the white thread along the top and bottom about 1/2" from the edge. Then stitch directly down the middle.

4. Re-thread your machine with the blue thread. In each of the two sections created by the previous stitching, fold the flaps the opposite direction so that the blue side is showing. You may have to pin the flaps in place. Stitch down the center of each section.
5. Cut out a piece of either blue or white fabric the same size as the top. Sew it to the top with right sides together leaving a small gap for stuffing. Turn it inside out, stuff it, and sew the hole closed.
One of the things I really like about this pillow is that it changes depending on the angle at which you are viewing it.

Comments