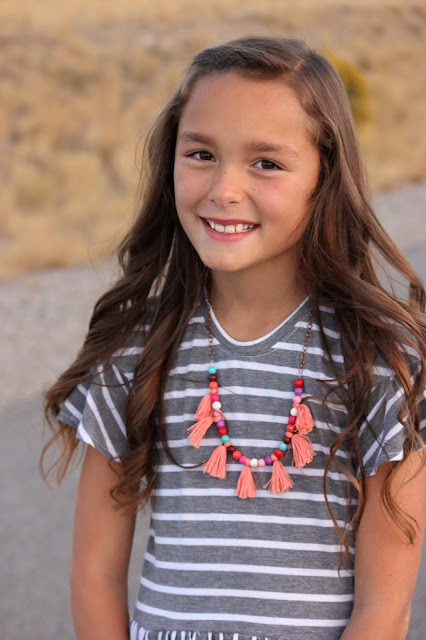
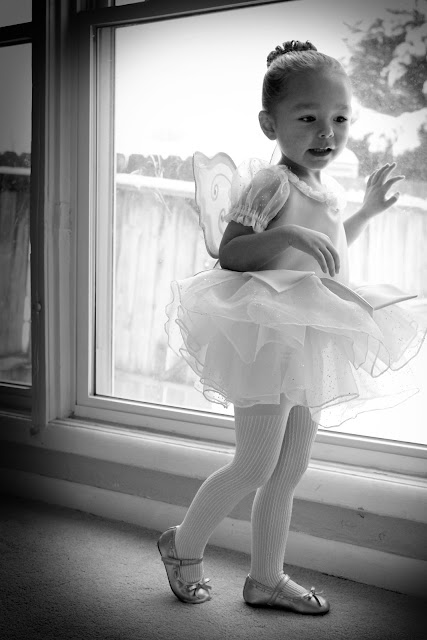
Tuesday, October 11, 2011

iPad Case for Dado

Why is it that men are so hard to craft/sew for? Other than the occasional mending job and the annual Halloween costume, Will gets nothing from all my crafty endeavors...except a hefty bill. Sorry Honey. Recently, however, I ran across a great tutorial for something I knew Will could use. An iPad case:


The tutorial I used was actually for a laptop sleeve, but it could be easily adapted for any electronic device. If you are looking for a handmade gift for the man in your life, I highly recommend making one of these.


As far as changes to the original tutorial go, I used fleece instead of felt and did NOT adhere it using spray adhesive. Since it is in one piece you can just sew it right in.  I also added a lip and decorative straps as well as some velcro for security. I knew I'd be likely to pick it up without thinking and watch in horror as the iPad slid right out. This commercial just makes me cringe.


If you are curious about the dimensions, these fit both the iPad One and Two:
  • Main body piece cut from vinyl and fleece - 11" by 18.5"
  • Straps - 1" by 8"
  • Circles - traced around a milk jug lid!
Helpful Construction Hints:
  1. After cutting out the Main Body Pieces, place the fleece on top of the vinyl. Next, fold the bottom up to 2.5" below the top of the rectangle. (The 2.5" forms the lip.) You will notice when you do this that the inside fleece will squeeze out past the vinyl a quarter of an inch or so as it becomes sandwiched inside the vinyl. No big deal, just trim it down again.
  2. Then, stitch the sides together 1/4" from the edge. A Teflon sewing foot will help or you can try using masking tape as Sweet Verbena did in her tutorial. (I used the tape method, and she's right, masking tape glides smoother. Painter's tape is also nice because it has less tack, but you can make regular tape less tacky by sticking it first to your shirt and then to the vinyl. I learned that "less tack is more" lesson the hard way and lost a bit of the top layer of my cheap costume pleather when I took the tape off.)
  3. Fold the top lip down, trim the fleece, and trace around a circular object to create rounded corners, if desired.
  4. Do decorative stitching around the edges. If you have trouble pulling your needle through, cut a small piece of vinyl and fold it around your needle to act as a gripper. (BTW, I used cording instead of embroidery floss. It's right next to the floss in the embroidery section of your craft store.)
  5. Add straps, if desired.

Thursday, September 15, 2011

Heads up!


So uh, this isn't a very substantial project, but I wanted to share it anyway. Now that I know I'm having another girl, I've allowed myself to be taken over by the "pink side" and recently made this little girly headband. It's nice knowing that these things will be well-used by both my girls. It makes me feel so much better about spending so much time and resources creating. Not that I was about to stop, but sometimes I wonder if it's really worth it. I mean I wouldn't be me if I couldn't create, but it's nice knowing my efforts will be appreciated twice over.

I loosely followed this tutorial from Sewing in No Man's Land using the scraps I had on hand and a piece of lacy elastic from JoAnn's.  I suspect this elastic is meant for underclothing. At least, that's what it brought to mind, but I won't tell if you don't.


Teagan was not in the mood to have her picture taken just before naptime the other day. Imagine that! I cracked a joke and she looked up and gave me this "Seriously, Mother? Get real!" kind of look. I think there was a little eye roll involved too. Talk about two going on seventeen.

Friday, September 9, 2011

Still Stitchin'

Even though I periodically disappear from the blog-o-sphere, I rarely stop creating for more than a few days at a time. The things I create are not always substantial and not always documented, but I've usually got something in the works. I have quite a few things in the works at the same time usually...a few too many right now. Half-finished projects are hiding all over my house. I'm just never quite sure what I'll want to work on during naptime or when the kids are down for the night.

Every once in a while though, a project totally consumes me, and I start and finish it within a few days or hours depending on how involved the project is.  This shirt, thankfully, ended up being a consuming rather than continuing kind of project.


For this shirt, I used the New Look Kids 6958 pattern and a Mary Engelbreit quilter's cotton. I'm not sure if this cherry print is still being sold, it was a gift years ago. (I finally decided to stop hoarding and start using my stash. That's so much harder to do when a print is as beloved as this one.) The actual fabric is quite a bit brighter than what is pictured here. I used a heavy bleach solution to discharge some of the color. I like yellow, but this was veering too close to neon. The bleaching ended up giving this fabric a great worn vintage vibe without making it look old. I love that.


Usually patterns run large, but this pattern's sizing is right on and the fit is great. Such an age appropriate design too.

I tend to make things more complicated than they are, but I held myself back with this one.  It already had a lot going for it with the pleating, square neck, and ribbon insertion. I did however add piping to the neckline and a placket on the back for that extra little pop. This placket is functional, but if you want to add a faux placket to one of your own patterns, here's a great tutorial over at No Big Dill.


So, there you have it, and if anyone out there pops in occasionally to see my occasional posts, know that this shirt will be well-loved and well-used because...

WE'RE HAVING ANOTHER GIRL!

Monday, August 1, 2011

Guess What?


Being that we find out the gender of this baby in two days, I should probably officially announce that:

Baby number three is due in December!

Tuesday, April 26, 2011

Rae Shirt Pattern and Thank you.

Before I begin, I just want to say:

Thank you.

Thank you to all you bloggers and blog readers out there.  I feel so goofy as I write this, but I really mean it. If it weren't for you all, I wouldn't have started sewing so avidly again. I wouldn't be constantly inspired. (I wouldn't have a "to make" list a mile long. :) I wouldn't have your lovely comments cheering me on.  Thank you.

Every once in a while, I actually finish one of those items on my to do list. This is one of them. Maybe this can become one of the items to make on your list too because...I've included the pattern and tutorial below!


I've named this shirt the "Rae Shirt" after one of my favorite bloggers, Rae of Made by Rae. It is after all inspired by (a.k.a copied from) one of her creations. I fell in love that shirt. I'm still envious of her gorgeous fabric and pure awesomeness, but I'm pleased with how this one turned out:


(I'm new to this whole pattern making process, so please forgive me for only including one size (12 months). It's all I have time for right now. If it helps though, Teagan was actually wearing 18 month clothes when we took these pictures and it seemed to still fit. So, I guess that makes it a size 12 month-ish.)

So here goes:

The Rae Shirt 
Size 12 months
Click here for pattern pieces.  

(The pattern is in PDF format so you will need Adobe Reader to read and open it.  It's free, and you can download it here.)
You can also find it on Scribd here


Supplies:
1 yard fabric
1/4 yard contrasting fabric for pockets
1/2 yard 1/4" elastic
1 yard double fold bias tape
(Here's a tutorial for making your own bias tape.)

Instructions with pictures come after "the jump."

Monday, April 4, 2011

Kasia Skirt

I do sew for myself every once in a while. When I saw this FREE pattern on Burda Style, I decided "once in a while" started now.


The fit of the pattern was spot on, and the directions were fairly easy to follow. I squeezed it out of just over a yard of stretch gray denim from "The Stash." (Something that takes up so much space in my house ought to be capitalized.)

The only change I made was to move the zipper to the back seam.  The pattern had it in the front underneath the flap.  Weird, right? Send me back to the 1800's as a man why don't cha? Other than that, I loved it. I kind of want to make another one especially because it has real pockets underneath that flap, and what girl doesn't need another skirt with pockets?

Saturday, March 26, 2011

Military Shirt

I finally sat down and finished the shirt I started for the Boy Challenge at Project Toddler Runway with Shwin and Shwin.  Funny, it's been sitting in my "to finish" box for over a month just needing sleeves sewn on and a few buttons, most of which I completed while the kids ate breakfast. For the love of procrastination! Argh.

Ah well. It's done now, and I am so pleased! (So is Liam!)


I created the pattern using my new favorite book Metric Pattern Cutting for Children's Wear and Babywear by Winifred Aldrich as a guide. This book basically shows you how to use body measurements to create a basic block or sloper that can then be altered to create a variety of patterns.  It's kind of like a cookbook for sewing. There's still altering for personal taste or fit, but it saves SO much time. I have learned so much about pattern-making from it.

The thing I love about a military shirt is the details, and I went all out on this one: a yoke, patch pockets with flaps, double top-stitching, sleeve plackets, and epaulets. I've always loved fussy little details, but I don't get a chance to use them much in boy's wear. Honestly, Liam is happiest in a knit shirt with some licensed character plastered across the front. He's still trying to get me to put a Lego Hero Factory character on this one.


I was surprised by how much easier sewing a sleeve placket was than I imagined. I used this great tutorial which includes a free pattern.


This shirt has a very narrow black and white stripe pattern that reads as a solid gray from a distance and does some funny things when being photographed. It was a Walmart find for $1 a yard that's been in my stash for a while just begging to be made into this shirt. (You thought I was going to say that was the best part, didn't you?  What? Have I done that before?) This time, instead of the price or the fact that it came from my stash, the best part is that it's a cotton polyester blend so it won't need ironing all the time! Yay!

Thursday, March 17, 2011

Another Belt

Lots of crafting, not so much of the doing the hair and all, so...here's another dummy picture of another accessory.  This bow belt was made using the fabulous tutorial by Tilly.  The only thing I did differently (to save a bit of time) was to use quilt binding. It was just the right width and already pressed.


I'm most proud of the cost of this outfit. I got the shirt off the clearance rack at Papaya for $3. The skirt came from Walmart. It's actually two mini-Miley-skirts put together to give it that ruffle effect. I just added a bit of fabric to the top of the under-skirt to lengthen it because let's face it, I'm not Miley Cyrus and no one wants to see that much of my legs.  Each skirt was $3. Not too shabby. The best part is that I can adjust the placement of the waistline of the skirt without affecting the length because they are two separate skirts. I can wear it at my waist or up for a high waisted look. I love a little variation in my wardrobe.

What I Should Be Wearing...

I'm sure you've seen many of the "What I'm Wearing" posts.  Well, this is a "What I could be wearing, if I'd bothered to shower, put on make-up, and do my hair" post. So...you get to see my recent creation on my dressmaker's dummy.

Just a simple ribbon belt to dress up an outfit:


I just sewed a pant hook to a grosgrain ribbon, and made a couple of flowers to clip on. Simple.


I didn't use a tutorial to make them, but this is a good tutorial for a ribbon belt, and this is a good tutorial for a singed flower

Monday, February 21, 2011

Most Intense Christmas Gift EVER


I don't know how she did it, but somehow my sister weaseled me into painting a portrait of her as a child this Christmas. In actuality, she commissioned me to paint it as a Christmas gift to herself, but how she got me to agree, I'll never know. Man, she's good. I think she must have asked me just after Halloween before the holiday rush when I was feeling all ambitious...and naive. (Don't anyone get any ideas. I'm not planning on making a habit of painting portraits. Just too intense at this point in my life.)

In all honesty, I have never painted a portrait before this one. I've drawn a few self-portraits for assignments back in college, but that's about it. I don't know what I was thinking when I agreed to do this. I haven't really painted in years. (The super simple paintings I've done for Liam's room don't count.)

I'm glad I did though. It pushed me, and was actually a lot of fun. I forgot how much I enjoy painting. Plus, I never get to spend any time by myself, completely alone. Even in the bathroom, someone is always walking in on me yelling, "MOOOOMMM!" so being able to sit in the back room by myself for hours on end was refreshing, but like I said, not something I want to get into the habit of doing. It'll have to wait until the kids are all in school.  (BIG thank you to Will who entertained the kids while I painted. This ended up being as much of a present from my family as it was from me. It was quite the marathon to finish it in the end, but I knew if I didn't give myself a deadline it would end up in the bottomless pit of unfinished projects at my house.)

More than anything, I'm glad I did it because now I'm not afraid to do it again. I've always wanted to paint portraits of my children, but never thought it was even plausible. This one definitely has it's issues that I'd rather not talk about, but it was my first and I look forward to painting more in the future and improving.

More about the painting process after the jump.

Related Posts with Thumbnails